


Ensuring data continuity and standardization is a major challenge.
Many development departments view library management as a time-consuming burden or a recurring source of critical errors.
Inaccurate component data remains the most common cause of project delays and budget overruns.
When schedules slip or a board requires an expensive re-spin, the cause can often be traced back to the library: an incorrect footprint, swapped pin numbers, or a component that went End-of-Life (EOL) before the design even reached the production line.
Without a centralized and well-defined library management strategy, you risk:
- Incorrect footprints, leading to costly PCB re-spins and wasted time and money.
- Use of obsolete or duplicate parts across different projects, compromising your proven standards.
This guide presents a proven, step-by-step process for setting up libraries in OrCAD X Capture.
You will get a practical walkthrough of the precise steps required to ensure your data is standardized, auditable, and compliant with modern industry quality standards.
Step 1: Configure Your Workspace
Before actual library construction begins, you must secure the foundation for team data access. This step ensures that everyone in the department is working from the same single source of truth.
The goal is to create a shared, stable data source accessible to the entire team.
- Navigate to View → Workspace → Configuration.
- Ensure your CIS Data Source is set to Cloud (not Local). This is essential for centralized Library Management, as it eliminates the risk of individuals working with outdated, locally stored data.
- Under the Users tab, invite other engineers or librarians to join the workspace by entering their email addresses. This ensures collaboration, stability, and establishes clear data ownership.
Step 2: Components and Data Validation
This phase covers the process of creating and searching for a component and integrating it into your system—either via import or manual creation.
Adding a component from a third-party provider
- Go to Place → Component. Alternatively, you can use hotkey M.
- From here, you have access to all components, including content providers like SamacSys, Ultra Librarian og SnapEDA.
OrCAD X features built-in integrations with leading online PCB part libraries that provide pre-validated symbols, footprints, and 3D models.
| Provider | Data Type / Focus | Function in OrCAD X |
| SamacSys / Ultra Librarian | PCB Footprints, symbols, and 3D-models | Direct import of CAD data; reduces footprint errors. |
| SnapEDA (Snap Magic) | Symbols, footprints, and data sheets | Ensures the schematic is layout-ready. |
How to add a component:
- Search for the desired component name (e.g., a specific MOSFET or passive part).
- Review the component, its metadata, and associated CAD data in the search results.
- Double-click the row and select Place. The system automatically fetches all necessary data (symbol, footprint, and 3D model).
- The component is downloaded and placed directly onto your schematic.

The benefit for you: This ensures that components—even those used for the first time—already contain the necessary data, eliminating the risk of manual errors in footprints and 3D models.
Step 3: Categories
While external sources are useful, company-specific parts, standards, and custom components should be created in My Workspace. This ensures consistency and control.
Organization via Categories (Templating)
My Workspace allows you to create a cloud-based library accessible to your entire team.
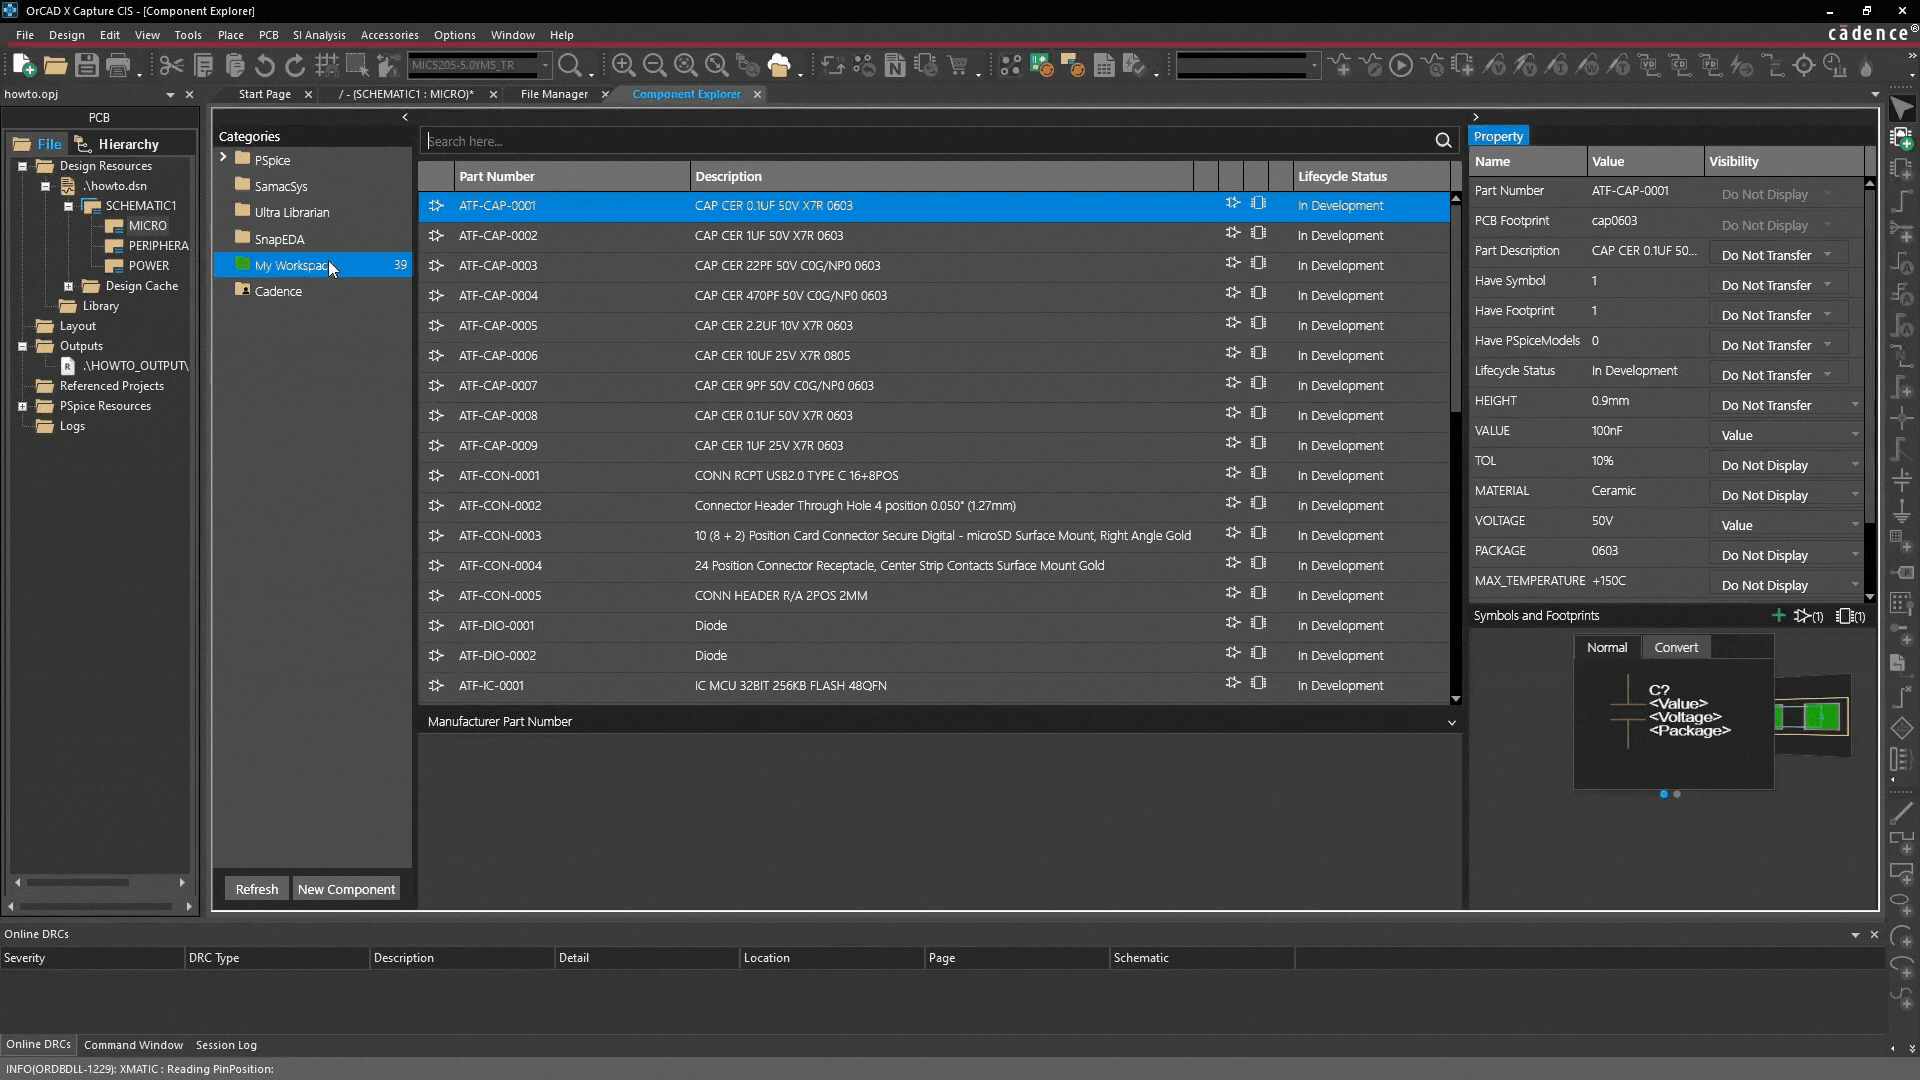
- Go to My Workspace: Select My Workspace in the Component Explorer.
- Create main category: Right-click and select "Add Category". This acts as a template for all future components in this group (e.g., "Capacitors" or "Company Specific Connectors").
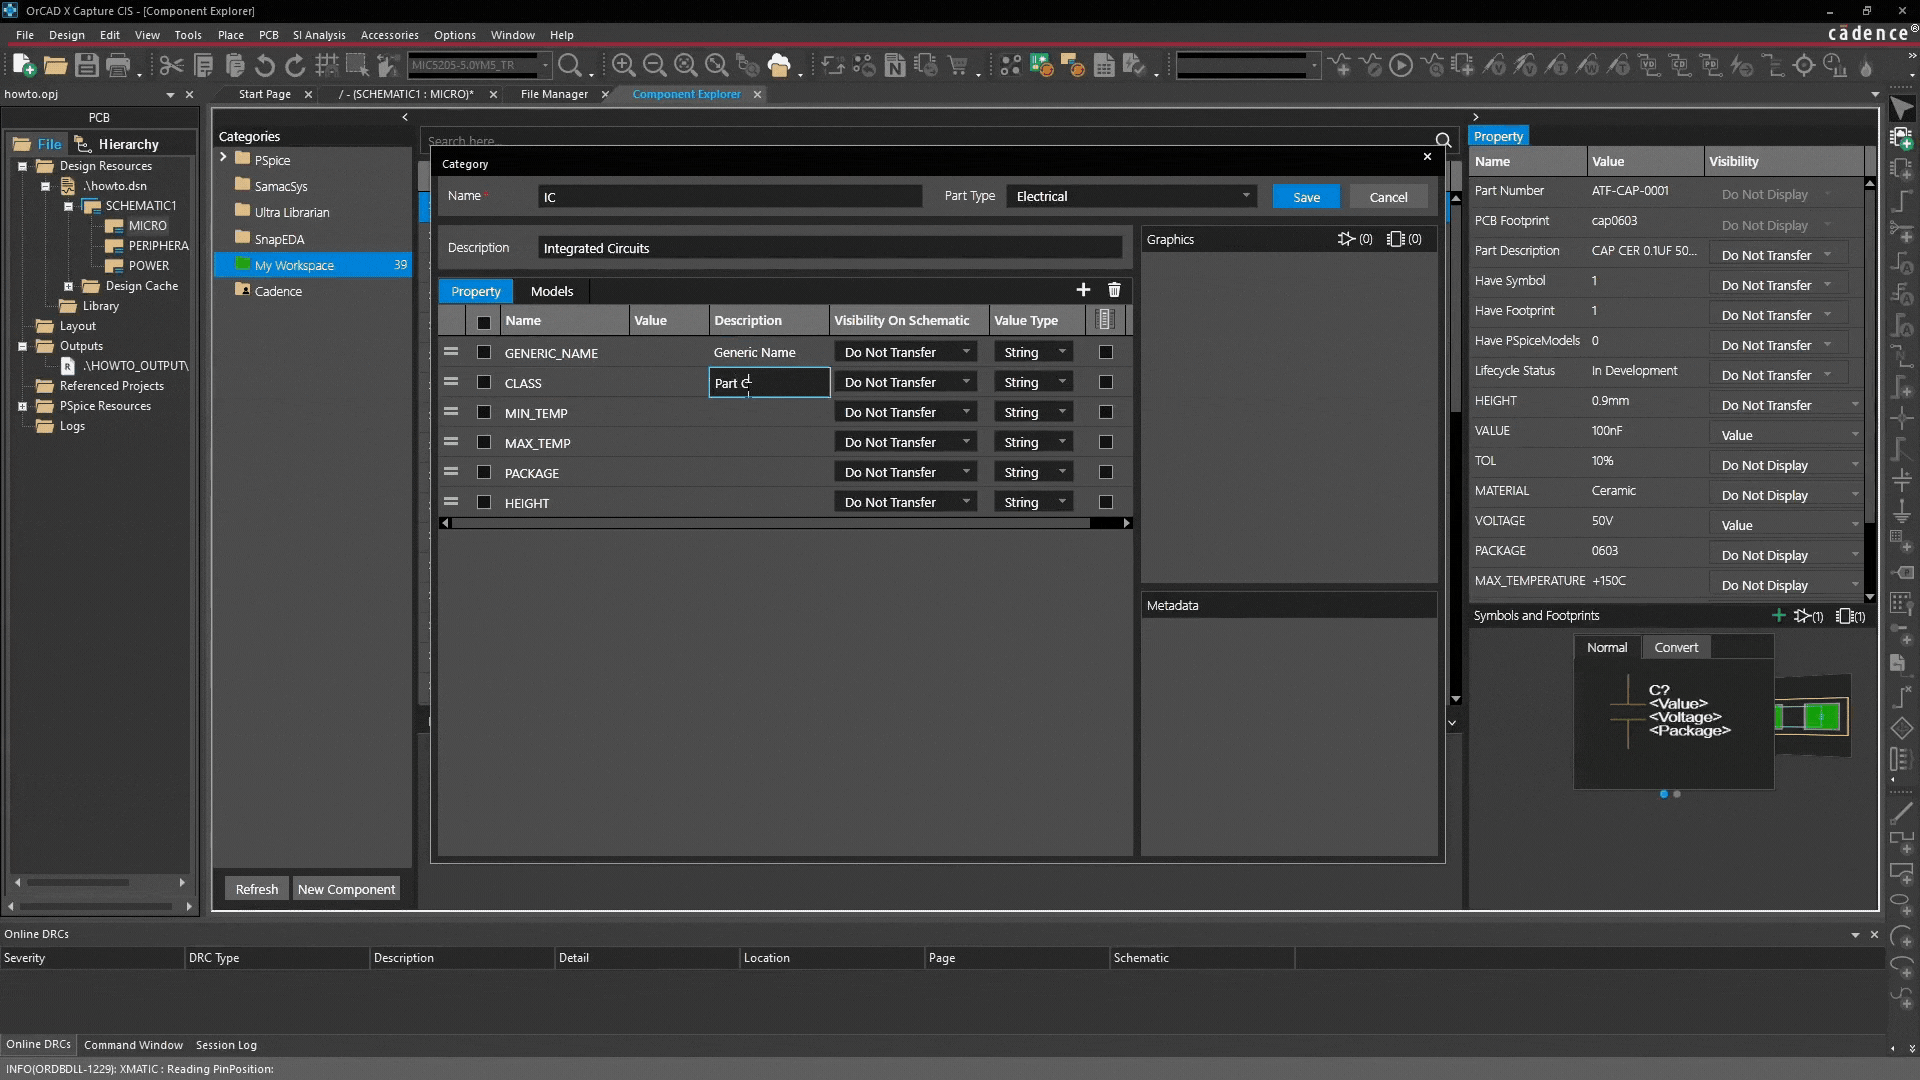
Defining categorical properties
The real value of categories lies in their ability to define standardized properties:
| Property | Purpose | Function |
| Part type | Classification (e.g. electrical) | Defines the basic component type. |
| Properties (e.g. tolerance, voltage etc.) | Standardization of the BOM (Bill of Materials) | Enter default values/descriptions (e.g., tolerance, voltage). |
| Visibility | Display control | Determine if it appears as a column in the Explorer or schematic. |
| Update needs | BOM synchronization flag | Mark if the property needs to be updated. |
Property examples:
| Type | Purpose | Function |
| Generic Name | Identification / Search | Ensures parts are searchable |
| Min temp / Max temp | Reliability | Essential for thermal design and risk reduction |
| Package / Height | Physical compatibility | Necessary for PCB and mechanical verification |
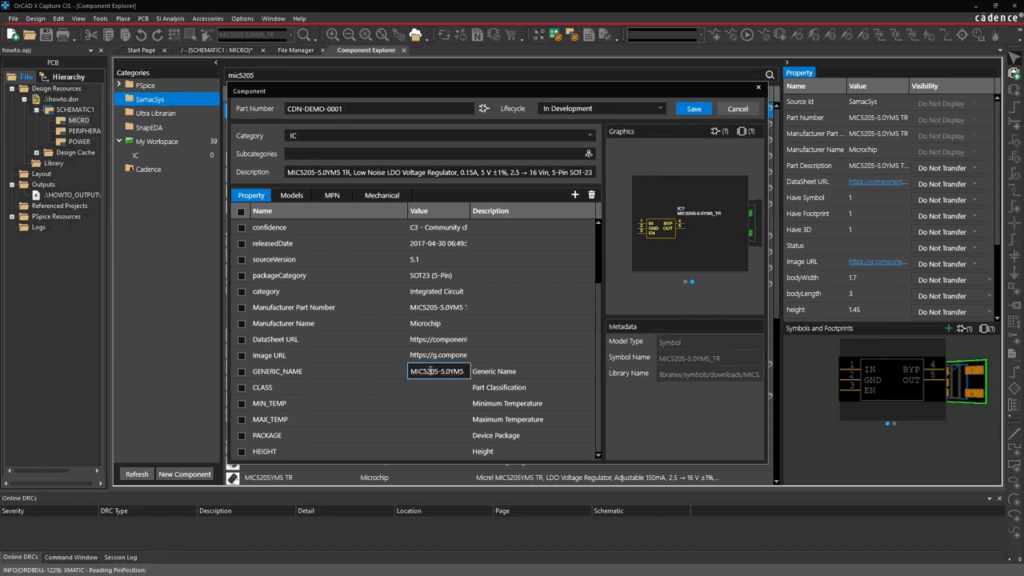
Linking Models (Symbols & footprints)
The category defines which CAD models the components use by default.
- Go to the Model tab.
- Symbols: OrCAD X includes a default template symbol library for generic symbols (e.g., standard resistors/capacitors).
- Footprints: Link your standard footprint to this category (e.g., a specific 0603 package). You can upload data via the File Manager.
- Click Save to finalize the category template
Step 4: Saving a Third-Party Component to Your Category
With the category template ready, creating and saving individual components is fast:
- Access a third-party provider in the menu and search for a component.
- Once selected, right-click and choose Add to Library.
- The new component window will be pre-filled with values from your category.
- You only need to fill in the unique data: Part Number and update the Life Cycle (e.g., to "Active").
- Update unique values (e.g., change capacitance from 10nF to 100nF).
- Click Save. Your library component count increases.
Further Structure with Subcategories
To manage large component families, use subcategories.

Example: Under the Resistor category, you can create "SMD" and "Through Hole." When creating a new component, select the relevant subcategory from the drop-down menu, as shown in the image above.
Why?
- It reduces the number of components displayed in a single category list, making it faster to locate the exact part.
- It ensures that components (e.g., an SMD resistor vs. a Through-Hole resistor) are not mixed together in the OrCAD X views.
- It helps enforce standards for naming conventions and data content within specific subgroups.
How to implement subcategories:
| Criteria | Example (Main category: Resistor) |
| Mounting Technology | SMD (Surface Mount Device), Through Hole (THT) |
| Component Type / Function | Fixed, Variable, Trimmer |
| Material / Tolerance | Precision, Film, Power |
Example: Under the main category Resistor, you can create subcategories such as:
SMD(f.eks. 0402, 0603, 0805)Through Hole(f.eks. Axial, Radial)
When creating a new component in the OrCAD X Library Manager, you will have the option to apply this structure:
- Open Component Editor: Start by creating or editing a component.
- Select Main Category: In the Category field, select the primary type, e.g., Resistor.
- Select Subcategory: In the drop-down menu (usually located directly next to or below Category, depending on your OrCAD X configuration), choose the relevant subcategory, e.g., SMD.
- Fill in Data: Proceed to fill in the component data, such as Part Number, Value, Tolerance, etc.
Best Practices for Sustainable Library Management
To ensure your library remains a driver of productivity, follow these guidelines:
1. Standardization via IPC
All footprints should follow IPC standards (e.g., IPC-7351B). Using integrated data sources minimizes the risk of non-standard footprints.
2. Version Control
Actively use the Life Cycle property (e.g., Draft, Approved, Obsolete) to control which parts are permitted in new designs and avoid EOL issues.
3. Centralized Data Management
Ved at bruge OrCAD X's Cloud Workspace kan I sikre at:
- Alle i teamet trækker fra den samme komponentdata.
- Alle ændringer i komponentdata kan spores tilbage til en specifik ingeniør.
- Data er tilgængelige uanset placering, hvilket understøtter distribuerede teams.
Turn Your Data into a Competitive Advantage
Library management is more than an administrative necessity; it is a direct investment in design quality and time-to-market. By following this structured guide—leveraging external sources and building a centralized, standardized workspace—you transform your library from a risk into a competitive advantage.
Next Logical Step: To ensure your implementation runs smoothly, Nordcad offers specialized consulting in library setup and management. Contact us to learn more about how we can save you time and money.
Ready for the next level?
If you already have the basics down but want to optimize your setup, we recommend reading our Guide to Library Quality Assurance, featuring checklists and tips for better team collaboration.